A couple of days ago, a friend (and parent of children who come to The Barn) asked me how I was able to get everything done. She said that she saw my posts on Facebook that showed all of the different classes, projects, and activities that we do and said that I must be really super organized. She said that she didn't know how I did it all. I can say the same thing about her; homeschooling three boys with a toddler in tow. I have no idea how SHE does it all.
She was relieved when I told her my secret: I don't do it all. I have to stay organized and give good face (and photographs) where work is concerned. That's business. But, where home life is concerned, things do fall by the wayside. I am so not perfect. LOL. I'm really a mess.
I told her that I couldn't tell her the last time I vacuumed the living room or our bedroom (but the playroom and "public" areas of our home get a regular sweep/vacuum), that I seldom cooked dinner (even though I do enjoy it when I have the time), hardly ever helped Lily with homework (I'm usually teaching in the afternoon), and that I don't do the laundry (Sweet Baboo does that). My closet and clothes piles make me want to cry, but I can't seem to do anything about them. I wait until I just can't stand it anymore and then clean it up. This happens maybe three or four times a year. My suitcase from our Texas trip in the beginning of January is still sitting on the floor, unpacked.
... and don't even get me started on my office/supply closet nightmare.
I reminded her that I only had one child, whom I had a lot of help with. Lily isn't here 100% of the time. She's at school, with Grandmom, with Grandpa, with Hailey, with her dad- the kid is in high demand! I'd love to have her with me all the time, but that's not the way it is. It's almost like not having a kid at all- even though she is always in my head and heart and I'm ready to drop what I'm doing for her at any moment. Not having a child (let alone four) around makes getting things done astonishingly easier.
As for all of my ideas and lessons, she asked me if I kept notes or something to gather all of them. I have journals (66 of them, as of today) that corral a lot of my ideas, I use Evernote to keep track of things, and I have a lot randomly stored in my brain's hard drive. That said, I procrastinate- a lot. I make a list of the lessons I want the Art Explorers kids to do over the course of the semester, then I fill in the blanks as the lessons come up. I create the newsletters, usually about an hour or two before the first class begins. It all seems very well planned out, and I guess it is, but behind the scenes, it's hardly the picture of calm. Party ideas peculate in my head when people book their date and theme, and I order materials for the events in advance, but sometimes I wait until the last minute and am semi-frantically running to Wal-Mart the day before (or the day of) the event to grab forgotten supplies, balloons, decorations, etc... I've learned that I work well under pressure, and that one way or another, things always work out.
Anyway, while I was flattered by the question/observation, it really illustrated the FB profile phenomena that I think we are all subject to (at least to a certain extent.) Comparison is the thief to joy. The photos and stories that we see and post, most of the time, don't tell the whole story. That's not necessarily a bad thing, but it's something that we always have to remember when we scroll. We are all fighting our own battles and have our own naked, messy truths. Something always has to give.
Friday, February 13, 2015
Thursday, November 6, 2014
The Body Gets Old, but The Heart Stays Young
When did I get to be the oldest one in the room?

I'll be 40 in 6 months. 40. The age that Meg Ryan wailed about in When Harry Met Sally. 40. While I know that is not "old," at least for those of us who are there or past there, it never ceases to surprise me when I realize that I'm older than many of the parents that send their kids to me at The Barn. I am a terrible judge of age- I never guess correctly, so I don't think about it much. But, then I see people celebrating their (fill in the blankth) birthday on FB and I realize woah- I'm 10, 12, 15 years older than her. Whaaa? How did that happen?
I started working with kids in high school. That led me to my first self-employed "real" job as a dance teacher and director of a mobile company that offered dance lessons to children at area preschools and private schools. I was around 20 when I bought that company from its previous owner, who was moving to Egypt. I was somewhat intimidated by all of the "grown ups" that I had to deal with, including school directors and the parents of the children I taught, and often felt uncomfortable addressing people by their first names. However, I knew what I was doing and, looking back, I am impressed with what I was able to accomplish at a pretty young age.
By the time I was 25, I was working as an itinerant artist-in-residence for the St. Tammany Parish school board, and was described as "young and vivacious" by one of the principals. I was fresh-faced, enthusiastic, and usually younger than everyone I encountered. My youth and energy made me appealing to the kids. Wherever I visited, I brought fun.


Time went on, Lily was born, and I started The Big Red Barn when I was 34. Hundreds of kids pass through here every year, and The Barn continues to grow. It surprises me when people seek me out for business advice, ideas, and mentor-ship, especially since I don't feel old enough to offer those things. But, I am.
We are heading into our 6th year now, and while time continues to go on, I still feel like that 20-year-old kid, thankful to be trusted with the children of "grown ups." I forget that I'm a "grown-up" too- at least on the surface. Inside, I'm much younger, and I think I always will be; maybe that's why the kids like me so much- I'm one of their species. :-)
I'll be 40 in 6 months. 40. The age that Meg Ryan wailed about in When Harry Met Sally. 40. While I know that is not "old," at least for those of us who are there or past there, it never ceases to surprise me when I realize that I'm older than many of the parents that send their kids to me at The Barn. I am a terrible judge of age- I never guess correctly, so I don't think about it much. But, then I see people celebrating their (fill in the blankth) birthday on FB and I realize woah- I'm 10, 12, 15 years older than her. Whaaa? How did that happen?
I started working with kids in high school. That led me to my first self-employed "real" job as a dance teacher and director of a mobile company that offered dance lessons to children at area preschools and private schools. I was around 20 when I bought that company from its previous owner, who was moving to Egypt. I was somewhat intimidated by all of the "grown ups" that I had to deal with, including school directors and the parents of the children I taught, and often felt uncomfortable addressing people by their first names. However, I knew what I was doing and, looking back, I am impressed with what I was able to accomplish at a pretty young age.
By the time I was 25, I was working as an itinerant artist-in-residence for the St. Tammany Parish school board, and was described as "young and vivacious" by one of the principals. I was fresh-faced, enthusiastic, and usually younger than everyone I encountered. My youth and energy made me appealing to the kids. Wherever I visited, I brought fun.
Time went on, Lily was born, and I started The Big Red Barn when I was 34. Hundreds of kids pass through here every year, and The Barn continues to grow. It surprises me when people seek me out for business advice, ideas, and mentor-ship, especially since I don't feel old enough to offer those things. But, I am.
We are heading into our 6th year now, and while time continues to go on, I still feel like that 20-year-old kid, thankful to be trusted with the children of "grown ups." I forget that I'm a "grown-up" too- at least on the surface. Inside, I'm much younger, and I think I always will be; maybe that's why the kids like me so much- I'm one of their species. :-)
Monday, September 1, 2014
Time, Please Slow Down
Scrolling through my news feed, I see kids going to college: freshly decorated dorm rooms, excitement, sadness. These aren't just any friends' kids; these are the children of people my age (give or take a few years.) How is this possible, when I was just there myself?
My child is a 11 years away from this rite of passage. When I think of how quickly the past 11 years have gone by for me, I realize that the next 11 are going to go by even faster- and it just isn't fair. Time, please slow down! But, it won't.
When we are growing up, those first 18 years seem to take forever. I couldn't wait to get out of the house and start my grown-up life. I moved out at 18, and to this day I'm not sure how it affected my parents- did they go through the same melancholy I'm seeing from friends on FB? Maybe it's because I didn't fly very far or maybe it's because they knew it was bound to happen, but it never occurred to me that they lost any sleep about me being gone. (Parents, if you're reading this maybe you can shed some light on it... lol)
As children, we consider ourselves central to everything in our parents' lives (if we are lucky, that is). But I don't think we understand just how much we are loved. I know I didn't. I didn't understand how much parents really love their kids until I had one of my own. It's a cliche, but it's true. My mom always referred to the years she spent raising us as the happiest years in her life. When I heard this as a young adult, I remember being surprised by it. I also kind of thought it was sad. Were we really that big a deal?
Yes, we were. We are.
When we are young, it doesn't occur to us that our parents had lives before we existed and that they will have lives after we have flown the nest. The 18 years of childhood are so brief, but so defining, for everyone involved. It's hard to fathom what life will be like when Lily grows up. I want her to stay 7 years old forever, but I know that is impossible.
Lily's wanting to get bigger, mature, and change is nothing personal; it's just the way it is. We hurry time along until we get to a place where all we want to do is turn it back again. How I would love to turn the clock back to her infancy, just for one day of blessed out oxytocin-infused baby holding bliss.
Friday, August 29, 2014
Felt, Duck Tape, Staples, and Style!

Tomorrow we are having a Style A Doll Art Camp at The Big Red Barn. We aren't a big "American Girl Family" here, but my daughter does have two Our Generation Dolls from Target and a couple of outfits for each. She likes them, but doesn't play with them very much. I have a feeling that when she sees this project, it will change the game completely.
I searched and searched for different ideas to include in our camp. I wanted the girls to be able to make and take at least two outfits, plus a couple of accessories for their dolls and some matching things that they could wear to match. I saw Duck Tape dresses, but they just didn't look right. I wanted to do something that would combine the texture of cloth and also take advantage of the convenience and trendiness of Duck Tape. I absolutely love the variety of printed felt that is available at Hobby Lobby and Michaels- and at 50 cents per piece, you can't go wrong! There is also a ton of printed Duck Tape, which you could use for this project with solid or coordinating felt. The sky is the limit!

I filled up a shopping cart with a variety of patterned felt and grabbed some Duck Tape that would match most of the prints I selected. I'm buying for a dozen girls, so I need to think about feasibility and simplicity. If you are doing this with your child, have them pick what they like best and go from there.
Here's what you need to get started:
2 Matching Pieces 9" x 12" Felt
Stapler
Duck Tape to Match (as many colors as you like)
Scissors
Embellishments
Marker or Pencil
Constructing The Skirt
 |
First, trim 2" off the widest side of your felt. This will give you a piece that is approx 12" x 7". If you want a really short skirt, you can trim a little more. Do this for both pieces.

Next, create gathers/pleats be pinching fabric together, folding to one side, and stapling. Staple close to the top edge, as we don't want to see the staples later on. Make sure that you aren't gathering the fabric too much by checking the width of the skirt against your doll. The top edge should ultimately reach from her left side to her right side. Note: gather the front of the skirt evenly across the waist, but only gather the sides of the back of the skirt (see photo). Later, you will cut the back portion of the skirt down the center and you don't want staples to be in the way. The back portion should be a little wider than the front portion to allow for an overlap later on.

Now, it's time to attach the front of the skirt to the back of the skirt. You could do this with a sewing machine or a needle and thread, but for our purposes, we're going to "sew" it with Duck Tape! Put the front and back portions of the skirt "pretty side to pretty side." Measure a piece of Duck Tape to fit from the waist to the hem and put it on with half of the tape on the felt and the other half over-lapping off of the side. Turn the skirt over, and fold the overlap over to attach to the other side. This should make the front and back pieces connect. Repeat on the other side.
Turn the skirt right-side-out, and you will notice that there is probably a little sliver of Duck Tape showing where the side seam is. You have a few options here, but we are going to use Duck Tape to cover it up and make some side stripes. You can use an entire width of Duck Tape or tear the Duck Tape in half, lengthwise. It's up to you! You can keep it simple and just put the stripes on the side, or you can create a striped skirt and put stripes of tape all around the skirt. It's up to you!
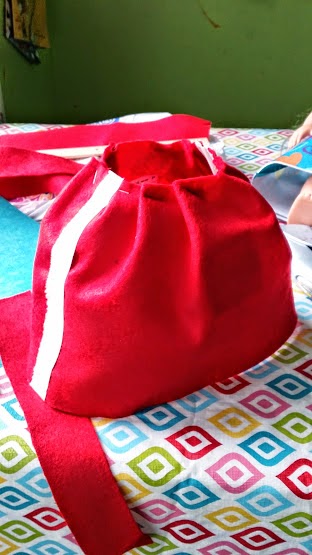

Once you cut the back of the skirt, measure it around your doll to make sure that it will fit. You may need to take out a couple of the gathers in the back (I did!). Your goal is to have the felt go comfortably around the doll and overlap a little bit.
Constructing the Bodice


Leave a portion of the sticky tape showing (as shown in the photo above). Measure another piece of tape the same length, and place it, sticky side to sticky side, on top of the other piece in the same manner. You should now have the felt sandwiched between the two pieces of Duck Tape.

Add another row of Duck Tape to make the bodice. 2 rows should do it. If you don't think it will cover up enough of your doll, measure it against her to make sure. Add as needed.

Style the bodice... I wanted this neckline to be a sweetheart one, so I laid the dress on my doll to get a good idea of proportion and placement of the straps. I placed the straps where I wanted them, but DID NOT tape them on. I marked the sides of the straps and sketched out what I wanted the neckline to look like. The front of the dress is the most important part, so I wanted to make sure that my doll had enough coverage. The sides of the straps showed me where I could begin my "armhole" cut, which I improvised. It's hard to describe, so I'm hoping that the pictures will tell the story.


After I cut my neck and "armholes" I had a little bit of black marker showing. I needed to figure out how to cover it up, so I tore tiny pieces of Duck Tape and overlapped them to give the bodice a sort of "lacy trim" look. I did it on the neckline and down the sides, as shown. I still didn't put the straps on- that's coming next.


I didn't put the "lacy" trim on the edge of the strap before attaching them, but I suppose you could if you wanted to. I added it afterwards, making sure to do it as neatly as possible. It's okay for it to overlap the felt strap a little bit to help secure the strap. Just use your best judgement and do what looks good to you.

Finish It Up!


You're almost there! Just lay the dress on your doll and wrap it around her back. Hold the two back pieces together and tape them together with matching Duck Tape. Your dress will easily slide on and off your doll. The felt will overlap, so you don't have to worry about sewing the back together, adding special closures, or anything like that.

Now, tie the straps and you're all done... Wait, not yet!

Grab some cute stickers, cloth flowers, ribbon, embellishments, contrasting Duck Tape, and add to your creation. I did a simple yellow flower for this one. The girls in camp will also get to make a matching doll barrette and headband for themselves.
So, there you have it! I hope this project inspires you to create! Feel free to share what you make with me by emailing me at bigredbarn4kids@gmail.com. If you want to do a party featuring this idea and you live near Ponchatoula, LA, visit our website at bigredbarn4kids.com for party information. Thanks!

Tuesday, August 26, 2014
Roots
I was Born and raised in SE Louisiana, in the suburbs of New Orleans.
I grew up in the middle of the woods at the end of a dead-end street
with two sisters and two amazingly smart, thrifty, and creative parents.
We were raised to be independent, to use what we had, to try to turn a
problem into a project, and to figure out things instead of having them
handed to you.
I come from a long line of entrepreneurs: my grandpa had a stationary store in the French Quarter, my great-great grandparents manufactured facial cream and eggs in the basement during the depression, my dad harvested cypress knees to make lamps and later manufactured model airplanes inspired by the corrugated plastic real estate signs that my mom used for work.
The apple didn't fall far from the tree. For as long as I can remember, I've been dreaming up different business ideas. (I recall opening a bank when I was around 8 years old and starting a newspaper, too.) But, the one that has always had the most energy was the multidisciplinary arts center that I dreamed about starting. The dream originated when I was around 18, and I was dancing all the time. I wanted to open a place that offered dance, theater, art, writing, and anything else that anyone could want to help them in their creative process. I started out in the dance realm of the arts, but have migrated over to visual art. I've learned that I am very good at managing things, dreaming up lessons, making connections between different disciplines, and setting the stage for fun and learning.
My brain is constantly working, wondering, thinking... It's great for the kids, but not so good for my sleep.
Tuesday, July 1, 2014
Frozen Insanity
In about a week and a half, we begin our saga of Frozen art camps. We have done four or five Frozen-themed birthday parties already, and whenever kids come in for class and see some of the remnants of Frozen decorations, they always wish (out loud) that they could have come to the Frozen party- even if they have no idea who the party was for. I am always dreaming up new events to offer at The Barn, and always aim to provide things that the kids will be interested in. Frozen was a no-brainier; but I had no idea just how popular it would become.
I don't normally subscribe to commercially branded themes for classes or art camps, but will do them, upon request, for parties. My thinking is that I want kids to open up their minds to things that they don't see every day. I've done princess and mermaid themed events without using Disney characters, and I like the flexibility that it allows. I want kids to see beyond the popular Disney images, to know that all mermaids don't have to have red hair and that all princesses aren't necessarily the ones printed on millions of lunch boxes, sneakers, and any other inanimate objects. But with Frozen, it's different. You can't do a Frozen themed event without including the featured characters. Frozen has become a household name. The word is no longer the description of water that has reached 32 degrees. The word is representative of a world of artistic icicles, a silly animated snowman, and (most importantly) Anna and Elsa.
As most of you know, kids are CRAZY about these two ladies. Team Anna, Team Elsa- they are both loved by millions of girls, but I think that Elsa wins the popularity contest. It must be the dress. And the superpowers. And the blonde hair. Ever notice that the blondes are just more popular? The evidence reveals itself when you go to Wal-Mart, Target, or Disney.com... You can find Anna merchandise, but Elsa is usually sold out. I'm not sure if Disney dropped the ball on the supply and demand of the merchandise or if they did it on purpose to create a frenzy. I stalked the Disney Store website for a month to (happily) fork over $50 a piece for Anna and Elsa dresses (plus the matching boots.) I'm not sure if I would have done that if they were always available.
In addition to the characters, there's the music. I will admit that I cried the first time I heard/saw "Let it Go." Now when I hear it, I just WANT to cry. We listen to a Pandora station during class, which plays a variety of Disney tunes, including songs from their popular movies. Whenever any song from Frozen comes on, everyone seems to freeze and exclaim "it's Frozen!" Most of the time, they stop whatever they are doing and rush into the playroom to dance and sing along. When this happens, they kind of remind me of zombies- or maybe Pavlov's dog.
Anyway, I knew that the kids would LOVE a Frozen Art Camp. I knew that we would easily fill up one day of camp, so I initially scheduled two days. I underestimated the love. I posted the event on our Facebook page, and both days were full within about 2 hours. People wanted more. I scheduled another one. FULL. Another one. FULL. Another one.... It took a couple of days, but it filled up, too. People are still calling and trying to get in- but I think my limit is five. There's only so much self-inflected Frozen madness that one can stand before going completely bonkers. But, it's so worth it. There are going to be a lot of extremely happy little girls (and some boys) for several Saturdays to come. It's also been a great way to bring new children to The Barn. I will let you know if I ever get the songs out of my head. :-)
Friday, June 20, 2014
One Week Down, Five More to Go!
Whew! It's been a busy and fun week at The Barn! We enjoyed a full house of 22-24 kids for our first week if Imagine! Summer Art Camp. The kids were great and seemed to have a wonderful time (although occasionally the volume reached such levels that I wondered if the nurses could hear them while having lunch on the patio of Dr. Allen's office, next door). Many children were here for the first time ever and expressed how much they liked our camp and wanted to come back- always a good thing! :-)
I had two amazing helpers, Ms. Ashley and Ms. Majestic. These two young women were in constant motion as we set up, cleaned, up, set up, cleaned, up, filled cups, dispensed paint, set up, cleaned up, washed brushes, wiped tables, on and on and on. Children at art camp complete three to five projects per day, which take a lot of prep work. Ms. Ashley and Ms. Majestic seldom needed to be told to do anything- they were eager to help and often took the initiative to do what needed to be done without any direction. Thumbs up! (Thank you, ladies!)
The week covered a variety of fun themes, as all of our camps do. Every week of camp will be totally different and feature fresh projects for everyone to enjoy. This week we enjoyed The Sky's the Limit, Aloha Art, The Noisy Paint Box, A Day in Central Park, and Flying Down to Rio. See below for copies of the newsletters that we sent home with each child for each day. I like to create newsletters for my classes so that parents can understand the intent behind our projects and see how one thing relates to another. Sorry for the typos; I'm usually doing these at about 7:00am the morning of class with my eyes barely open. I'm a wonderful planner, but I'm equally good at procrastinating. One way or another, everything always gets done!


There were so many projects this week, it's hard to pick the one I liked best and thought was the most successful. I'm leaning toward the abstract painting on canvas, inspired by our Kandinsky lesson. The children really enjoyed the freedom the activity provided and spent time thinking about their use of color and composition. I love the way their paintings came out. They were all very proud of their work.

A very teachable moment revealed itself during the lesson. As I was describing the process of abstract painting (well, one process anyway- there are many!) a child said "you can just do whatever you want, with your eyes closed!" On the contrary, I explained. Although I'm sure that blind art exists and can be considered a sort of art-making process, most abstract pieces have a lot of thought behind them. There is a sort of process and craft in where, how, what, and why elements are used in particular ways. Happenstance painting does happen, but that doesn't mean there isn't any thought behind it.
The second and third runners up would be the wooden carnaval masks, painted in watercolor and adorned with feathers and jewels, and our Central Park cityscapes, drawn in oil pastel and painted with chalk pastels. Those came out really neat. Of course, I was too busy to take pictures of the works in progress or the finished products. Oh well!
The most challenging project for the children was the frisbee painting. I thought it would be fun for the kids to create different things they might play with in the park for our Central Park day. Painting plastic can be a challenge, even with paint that is supposed to work on plastic. Too much water, too much smearing, can make the paint bead up and have a faint look. To remedy the problem, I instructed the kids to "dip and dab," using little dabs of paint on the frisbees so the paint was thicker and brighter. A happy coincidence was that we were also discussing Georges Seurat's work that day, which offers wonderful examples of pointillism. Our frisbee painting (near) fiasco actually turned out to be a great way for the kids to experience painting with "points."
We have so many more wonderful things to look forward to this summer- I can't wait to share them with you and your kids! I hope you will join us for one (or more!) of our camp weeks at The Big Red Barn. Thanks for your support!
I had two amazing helpers, Ms. Ashley and Ms. Majestic. These two young women were in constant motion as we set up, cleaned, up, set up, cleaned, up, filled cups, dispensed paint, set up, cleaned up, washed brushes, wiped tables, on and on and on. Children at art camp complete three to five projects per day, which take a lot of prep work. Ms. Ashley and Ms. Majestic seldom needed to be told to do anything- they were eager to help and often took the initiative to do what needed to be done without any direction. Thumbs up! (Thank you, ladies!)
The week covered a variety of fun themes, as all of our camps do. Every week of camp will be totally different and feature fresh projects for everyone to enjoy. This week we enjoyed The Sky's the Limit, Aloha Art, The Noisy Paint Box, A Day in Central Park, and Flying Down to Rio. See below for copies of the newsletters that we sent home with each child for each day. I like to create newsletters for my classes so that parents can understand the intent behind our projects and see how one thing relates to another. Sorry for the typos; I'm usually doing these at about 7:00am the morning of class with my eyes barely open. I'm a wonderful planner, but I'm equally good at procrastinating. One way or another, everything always gets done!
There were so many projects this week, it's hard to pick the one I liked best and thought was the most successful. I'm leaning toward the abstract painting on canvas, inspired by our Kandinsky lesson. The children really enjoyed the freedom the activity provided and spent time thinking about their use of color and composition. I love the way their paintings came out. They were all very proud of their work.
A very teachable moment revealed itself during the lesson. As I was describing the process of abstract painting (well, one process anyway- there are many!) a child said "you can just do whatever you want, with your eyes closed!" On the contrary, I explained. Although I'm sure that blind art exists and can be considered a sort of art-making process, most abstract pieces have a lot of thought behind them. There is a sort of process and craft in where, how, what, and why elements are used in particular ways. Happenstance painting does happen, but that doesn't mean there isn't any thought behind it.
The second and third runners up would be the wooden carnaval masks, painted in watercolor and adorned with feathers and jewels, and our Central Park cityscapes, drawn in oil pastel and painted with chalk pastels. Those came out really neat. Of course, I was too busy to take pictures of the works in progress or the finished products. Oh well!
The most challenging project for the children was the frisbee painting. I thought it would be fun for the kids to create different things they might play with in the park for our Central Park day. Painting plastic can be a challenge, even with paint that is supposed to work on plastic. Too much water, too much smearing, can make the paint bead up and have a faint look. To remedy the problem, I instructed the kids to "dip and dab," using little dabs of paint on the frisbees so the paint was thicker and brighter. A happy coincidence was that we were also discussing Georges Seurat's work that day, which offers wonderful examples of pointillism. Our frisbee painting (near) fiasco actually turned out to be a great way for the kids to experience painting with "points."
We have so many more wonderful things to look forward to this summer- I can't wait to share them with you and your kids! I hope you will join us for one (or more!) of our camp weeks at The Big Red Barn. Thanks for your support!
Subscribe to:
Posts (Atom)